The Azure Storage platform is a Microsoft’s cloud storage solution for modern data storage scenarios. Azure Storage offers highly available, massively scalable, durable, and secure storage for a variety of data objects in the cloud. Azure Storage data objects are accessible from anywhere in the world over HTTP or HTTPS via a REST API.
Benefits of Azure Storage
Azure Storage services offer the following benefits for application developers and IT professionals: Secure, Scalable, Managed, Accessible, Durable and highly Available.
Azure Storage data services
The Azure Storage platform includes the following data services:
- Azure Blobs: A massively scalable object store for text and binary data. Also includes support for big data analytics through Data Lake Storage Gen2.
- Azure Files: Managed file shares for cloud or on-premises deployments.
- Azure Queues: A messaging store for reliable messaging between application components.
- Azure Tables: A NoSQL store for schemaless storage of structured data.
- Azure Disks: Block-level storage volumes for Azure VMs.
Manage Blob Storage Containers with Command Line Interface
To understand how can manage Azure Storage, we will explain the following example,
Prerequisites:
- Azure Account, If you don’t have an Azure subscription, create a free account before you begin.
- The Azure CLI, If you need to install or upgrade, see Install Azure CLI
For this example lets create a container inside an azure storage account and upload a file,
First create a resource group with the az group and az storage account with create command:
az login
az group create --name testgroup --location eastus
az storage account create --location "eastus" --name test01234 --resource-group testgroup --sku Standard_LRS
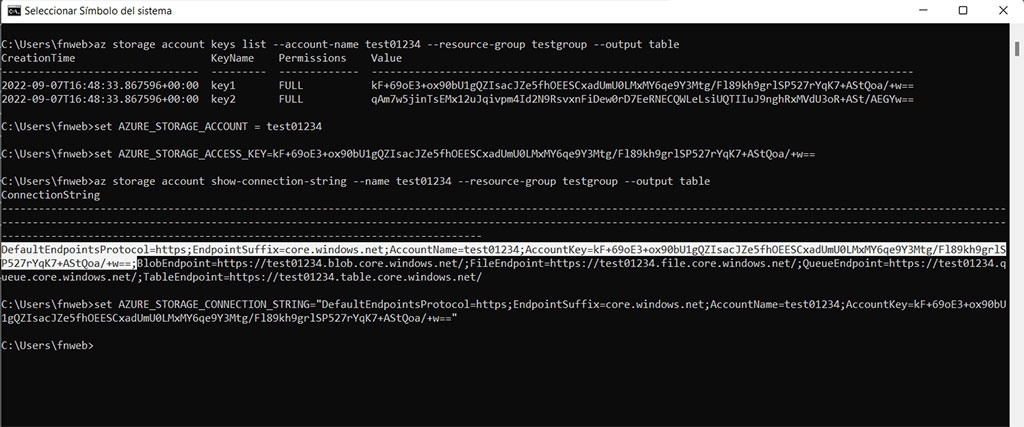
Next generate the list the access keys for a storage account:
az storage account keys list --account-name test01234 --resource-group testgroup --output table
set AZURE_STORAGE_ACCOUNT = test01234
set AZURE_STORAGE_ACCESS_KEY=kF+69oE3+ox90bU1gQZIsacJZe5fhOEESCxadUmU0LMxMY6qe9Y3Mtg/Fl89kh9grlSP527rYqK7+AStQoa/+w==
Is important to copy the key1 for AZURE_STORAGE_ACCESS_KEY to access the Azure Storage Account, 
Establish the connection with the Azure Storage Account:
az storage account show-connection-string --name test01234 --resource-group testgroup --output table
set AZURE_STORAGE_CONNECTION_STRING="DefaultEndpointsProtocol=https;EndpointSuffix=c*
ore.windows.net;AccountName=test01234;AccountKey=kF+69oE3+ox90bU1gQZIsacJZe5fhOEESCxadUmU0LMxMY6qe9Y3Mtg/Fl89kh9grlSP527rYqK7+AStQoa/+w=="
Is important to copy the AZURE_STORAGE_CONNECTION_STRING, a connection string includes the authorization information required for your application to access data in an Azure Storage account at runtime using Shared Key authorization

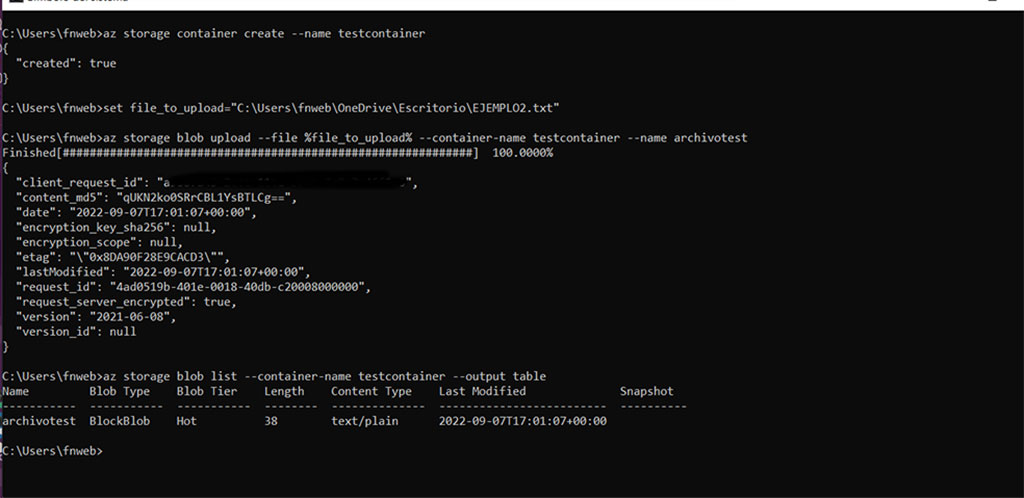
Finally, create Azure Storage Container and upload the file with this command:
az storage container create --name testcontainer
set file_to_upload="C:\Users\fnweb\OneDrive\Escritorio\EJEMPLO2.txt"
az storage blob upload --file %file_to_upload% --container-name testcontainer --name archivotest
az storage blob list --container-name testcontainer --output table
file_to_upload = location of the file that want to upload

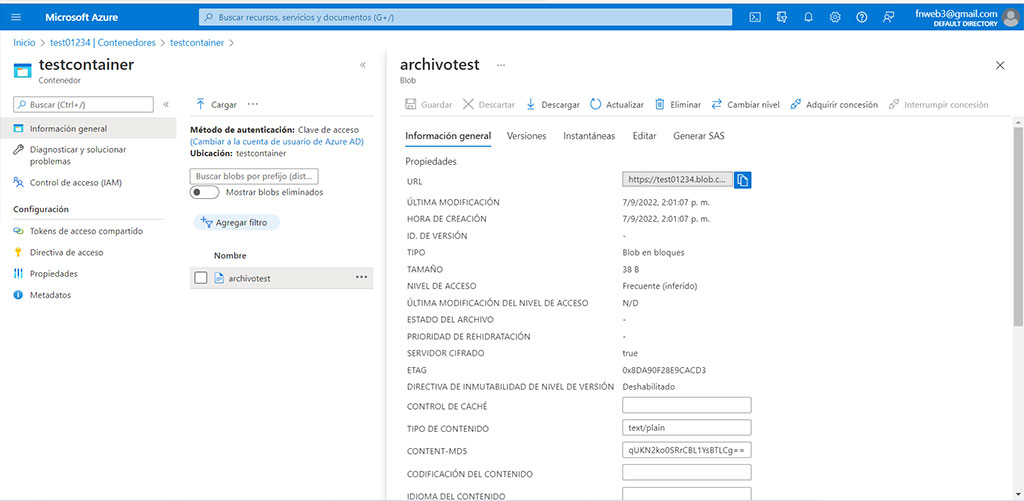
Finally check in the azure portal if everything is fine, it’s important that you consider permissions RBAC and personal token if you want to share to public or private users.

Contact us for more information or visit our blog.

